Wednesday 27 April 2016

Soft Clay, Cabochons, Piping

Recently, I've been spending more time doing what I like most, creating, hands-on craft. Last week, I was "drilling" Fluttershy's head, transforming her from a toy figurine to a necklace. And this week, I've finished all my orders and had a little break. I decided that my silicone mould is in the storage for too long and needed to make use of them to come out with something useful.
Using silicone moulds, I decided to use soft clay to make my own Cabochons
Few months back, I've bought this silicone moulds and epoxy solution wanting to use them to make resins cabochons but I've yet started really making them. I've tried once but they dry and harden at a very slow pace and the mixing of the solution A & B can be..... a little messy. So with this little free time I have, I've took out my soft clay and started moulding them in cabochons I could use on my decoden.

100% HAND MADE
 The 100% HAND MADE cabochon is actually using a mould, supposingly to make my own soap, but who knows, I'm now using it make cabochons instead. Isn't it cool??
Painted some of them to give them the contrast colour
 I have some "Channel", "LV", "Adidas" mould and instead of using 2 different soft clay to have a different colour, I used acrylic paint to create the contrast colour here. That's suppose the "Channel" signature black and white colour isn't it? Same for the Adidas logo. I'm so excited about them. Can't wait to start creating cute decoden cases with them.
Added some glitter on the crown cabochons.... so pretty!!!
 So as you can see from the above photo, I've used white and sky blue soft clay to make different cabochons, I have the alphabets, hearts, ribbon and bow, crown and tiara. Same shapes are easier to make but some may break easily while removing them from the mould. So this is very delicate and soft work. If i'm going to press too hard on the soft clay cabochon, it's going to be out of the shape I wanted it to be. Being experimenting and always wanting something different, I've tried to apply glue and glittered the crown to give it a little "bling bling" look. Loving it so much.

You can create your own cabochons if you want to by using shapers and tools for soft clay. I wanted it to be more uniform and more consistent in terms of size therefore I uses the mould instead. It's more cost effective in terms of the time consumed to make these.
Practising my piping skills with white simulation cream 
 After doing as many cabochons I can, I took all of them out from the moulds and set them aside to set. While waiting, I decided to do some practising on piping of the simulation cream on a used iphone 6plus silicone case. This needs a lot of concentration, good timing and consistent strength. Most importantly, strong fingers to be able to squeeze out the simulation cream.

My right thumb is sore by the time I reached the middle of row four. That's when I decided to take a short break and "snap snap".

Keeping a record on the progress is something that I lack doing and will probably consider taking video instead in the near future.

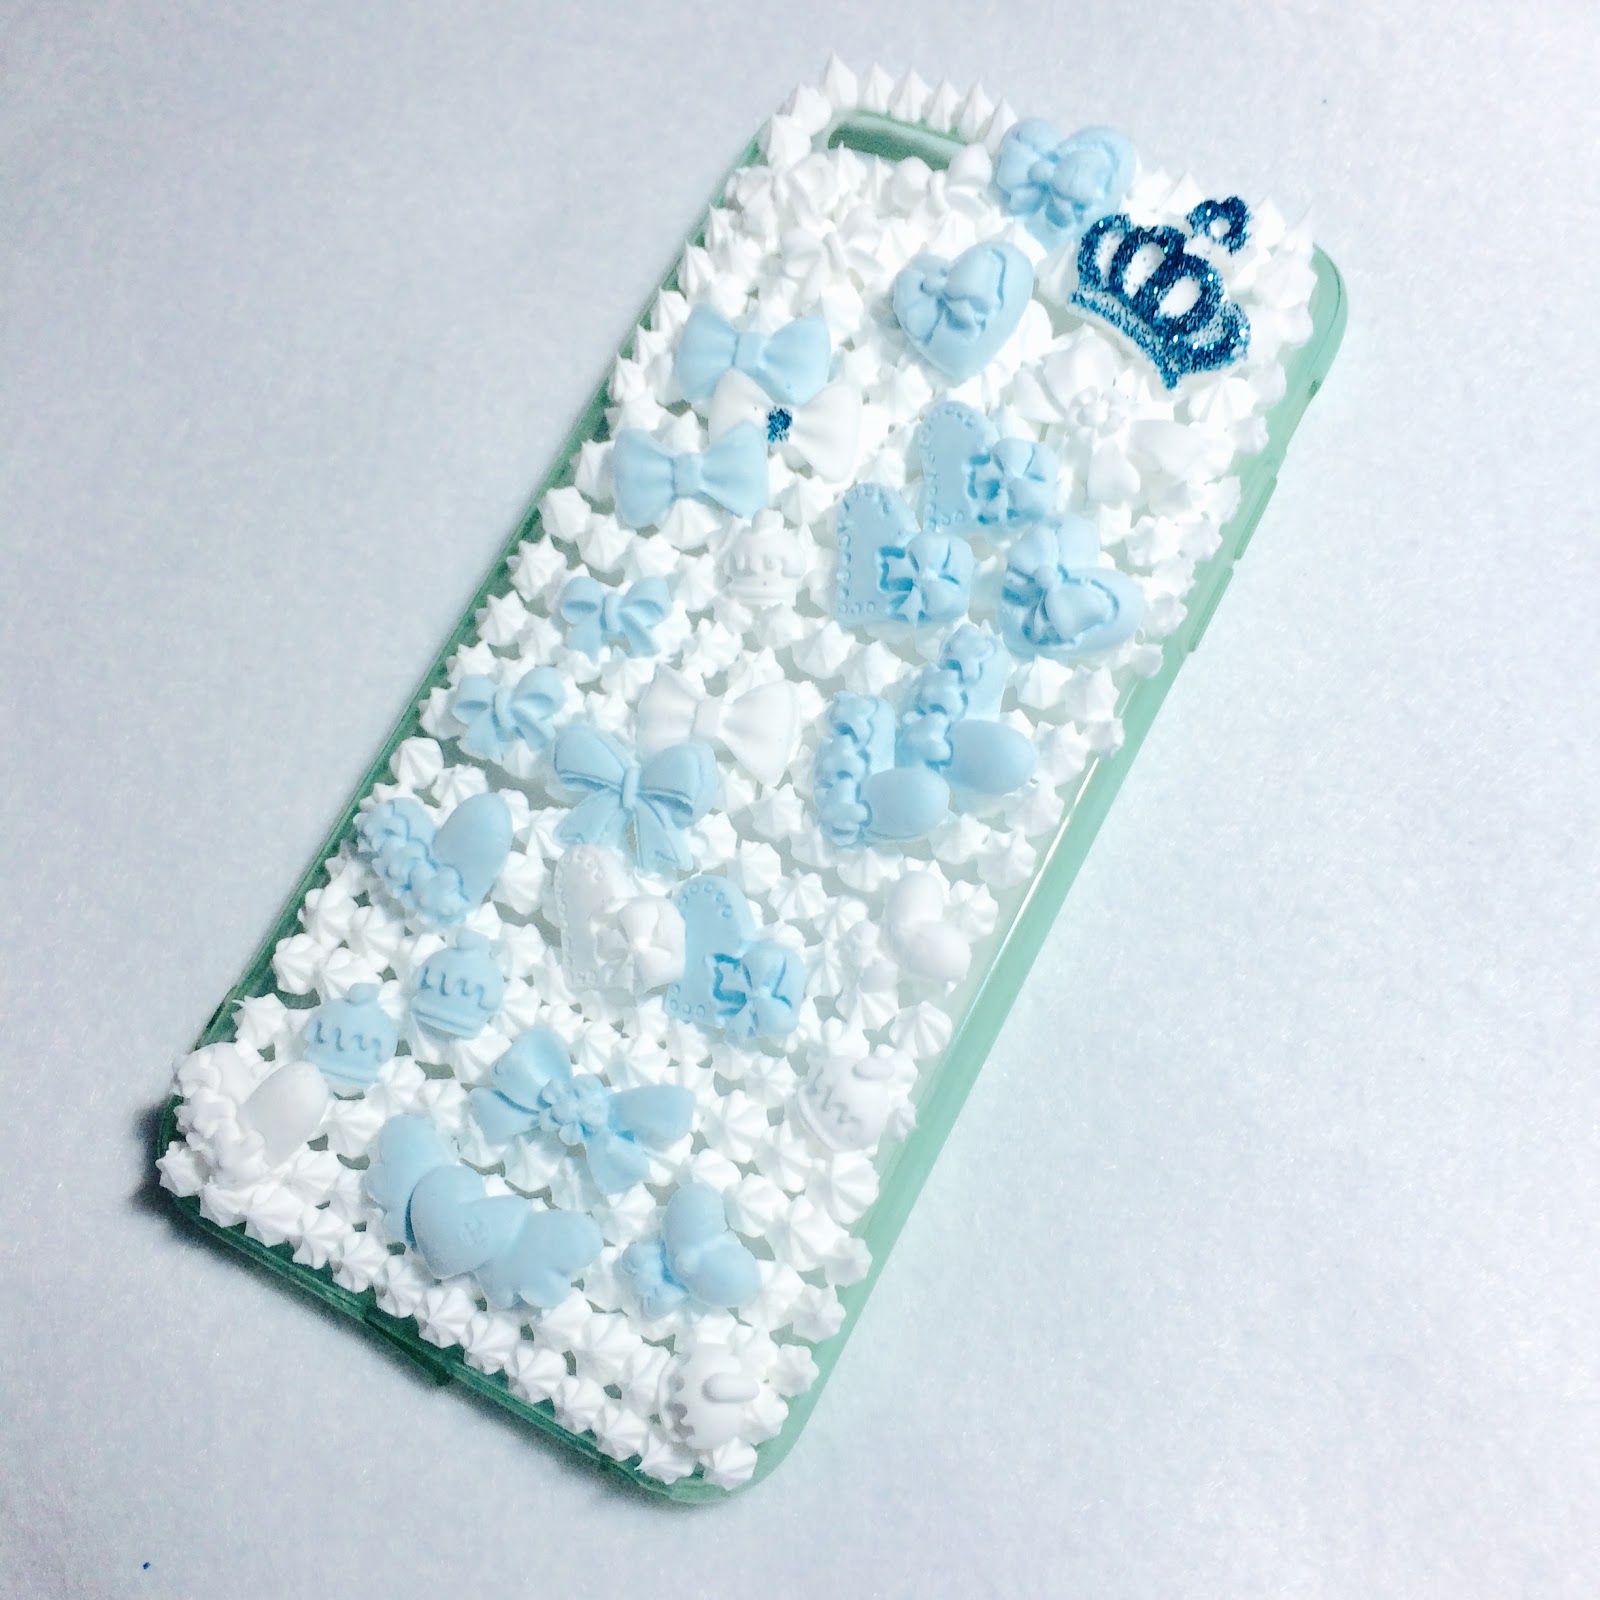
While piping all the way down to the bottom of the phone, I started placing the "almost" set soft clay cabochons to decorate the phone case along the way. There is no sequence, no order, just free flow of ideas what to put and where to place.
And wahlah!!! So pretty!!! So in wedding mood.
After this is completed, I thought maybe that's it, end of creation. Later I decided to add on, more " bling bling". Rhinestones and acrylic diamonte, they just made it look more sophisticated than just sweet.


Don't you think it just look like a wedding cake?

With some editing on the photo, I'm presenting this decoden iphone 6/6S plus casing. Will be ready to use once the simulation cream is cured.


Edited by Snapeee app on my iphone 

I'm hoping to practice more piping skills and techniques and have more improvised version of decoden for sale and of cos to place My Little Pony onto them.


Wednesday 20 April 2016

Transforming Fluttershy into a Necklace


Fluttershy Necklace Project nailed!!!
Someone contacted me and asked if I could modify her own existing My Little Pony Collection into necklaces and bag charms. The first thing that came to my mind then is, "Will you entrust me to start drilling and punching holes into your precious My Little Pony figurines that will be irreversible?"

Gladly, she trusts me to be able to do the job for her and I collected her babies to be able to start working on them at home.

She has requested to take photos of her babies in the transformation process and I'm more than happy to provide such a value-added service as I usually don't take photos while creating my orders. So yes, this time round, I'll make it a habit to take before and after pictures. Which is good as I can feature these photos on my instagram and blogs. {Heehee}

First to start working on, I picked Fluttershy, maybe because that is the first one in the list in our chat messages. I took out the 'cocoon' I've prepare earlier, picked and packed all the selected charms requested.

Laying out nicely in position, the "before" photo of Fluttershy and all the deco charms.


While working on it and taking photographs along the way, something suddenly hit me which is unusual. A PINCH! "OUCH" is what I felt that very moment. As you know, we tend to take a few shots to find the perfect picture, re-positioning the object to get the nicest angle. Usually what I will do, first step is to find the right position, drill a hole on the pony's head, insert the eye-pin screw and secure it.


Looking at one of photo with Fluttershy's head with the eye-pin screw-on, on my iphone screen. It felt painful and this is the first time I'm experience such emotions. I'm wondering, is there really life in this non-living thing in front of me? Maybe like the movie, Toy Story, they can really talk and walk when we are asleep!!!????


Gosh!!! I will have so many of them walking around in my room then?

Imagine, Fluttershy wakes up when I slept and go sobs softly sharing with Rainbow Wishes, "I'm having a bad headache because of that 'thing' on my head. And soon it will be your turn to experience this." Looking sadly at Starlight Glimmer (next one on my list), whom looked terrified knowing that she is going to be the next one on the list to be *DRILLED*.


Nevertheless, this weird experience. Maybe it is my own hallucination when one don't get enough sleep. It is still a great accomplishment being able to transform a toy into an accessory. Being able to proudly wear it along with our #ootd showing off to everyone that I AM A MY LITTLE PONY FAN^^
Finished product: Fluttershy in a metal chain and 3 rainbow, Macaroons and Lollipop Deco Charms.

I'm now hoping to finish up another 3 more toys so that I can quickly return her all her lovelies and soon able to view her photos on Instagram on how good they looked on her.

Once again, thank you for reading my blog. Do remember to follow @vanilladreamssg on Instagram and "Like" our Facebook page, www.facebook.com/vanilladreamssg to keep yourself updated with giveaways and promotion coupons to be used on our website. We need 200 followers to start giving out our giveaways to our supporter and we are definitely not looking at "ghost" followers on Instagram. Give us your love and support!!! 

Last but not least, do leave us any comment on what you would like to see and we will do it better in future.

XOXO
Matilda
Vanilla Dreams

Thursday 14 April 2016

Our Cocoons, Our Babies


Cocoons in the process for transforming

Our cocoons, our babies. I used to make use of new cupcakes holder before I have these plastic drinking cups. This is the first time I'm using the plastic cups and they just look like cocoons to me. *Laugh*

If you were to ask me what do I do with them?

Here you go...

I will use them to sort out and organise my new orders. Sometimes could be that one special order and sometimes could be a bulk order, that all depends.

Firstly, I will pick out the ordered pony to transform. (PS: I have a huge range of pony designs here. If you are interested to know how I organise them, I will show you in my subsequent blog.) It is easier to sort them out so I don't get the wrong pony later or miss out anyone. Like this, I will be able to count how many orders I have on hand and ready to transform them anytime.

Secondly, I will start to mix and match the charms/tassels/pompoms/beads by color and character. Depending on the number of charms ordered for each pony, they are being picked carefully to be the most eye candy. And sometimes, I will have to pick those letter for name/message customisations.

Thirdly, distributing the parts and get them all together, ring, clips, chains etc...

Lastly, to select which one to design first! 😊

Each made with love and devotion therefore they are so irresistibly adorable and liked by many individuals of different age group.
Each Made with LOVE

Friday 8 April 2016

Japanese Deco Phone Case with My Little Pony

Having some free time out of my usual work. I'm ready to finally start working on something that I've been wanting to do but yet didn't have the time.

Japanese Decoden phone case!!! Yes!!! They are simply irresistible and I've tried to incorporate Vanilla Dreams My Little Pony collection's figurine.

Let me see, hmmmm maybe I'll start with one for Richelle. Although Richelle is a fan of Fluttershy, recently she is now more fond of blue colour so I chose Rainbow Dash to be the lime light this time.

I rapidly picked a few suitable deco with matching colours, trying out different combinations and placing of the deco on a plain white Note 5 phone case ( Richelle owns a Note 5) and with Rainbow Dash.

Came to a decision, I started working on it. I was facing some difficulties at first, especially when squeezing out the "icing" to make up the sticky base. They are so thick and vicious, it hardly want to come out of the tube 😭😭😭 Had a hard time initially but later get the hang of it and became easier. I spread the cream glue evenly to make it resembles icing on cake and prepare my deco to place on the icing. Lastly, will be to sprinkle the rainbow coloured sprinkles all over and tada!!!
Isn't it pretty?? I'm so loving this!!!

After taking pictures of it with extra care not to mess up the silicone glue, I placed it aside to let the silicone glue set and harden before use.

Admiring it further when editing the photo and posting it up on my personal Facebook account. I couldn't get enough of it and I decided to make another one for myself!!! Lol!!! 😆😆😆

Second time round, it's easier doing it and I have more control of what to expect. This is the outcome...


Blue coloured silicone glue instead of white and lesser sprinkles for this piece.

Do you like it??? Please do leave down your comments.

Don't forget to follow us on Instagram @vanilladreamssg to look out for giveaways in the near future. Cos we might be planning to give these super super cute phone cases away!!!

XOXO
Matilda
Vanilla Dreams 

Sunday 3 April 2016

Our First Official Order from Carousell

Sweetie Swirl Bag Charm / Keychain
Pretty in Pink Sweetie Swirl with matching Strawberry Macaroons
and pretty Metallic 10mm Pink & Blue Beads and Pastel 6mm Beads
beaded into a ring charm.

Rainbow Dash Bag Charm / Keychain
Blue Rainbow Dash with Rainbow colored mane with a matching
Rainbow character charm and Jello colored beads and star-shaped
beads beaded into a ring charm to enhance the prettiness here.

Sunny Ray Bag Charm / Keychain
Translucent Neon colored Sunny Ray Pony, we tried to use neon 6mm colored beads,
Clear 8mm beads and Jello 10mm coloured beads for the beaded ring charm and a
rainbow character charm.

These are the 3 design Matilda first made for a customer in 2015 November whom ordered 3 designs for her nieces from our Carousell shop.  

Our Carousell shop can be found in App stores both on android and IOS phones. We have joined since 7th August 2014 as a "Carouseller". The first day when Matilda's Toy Shop started our online business which subsequently we changed our business name to Vanilla Dreams and is a registered company 1 year ago.

We started off back then 6 months ago with limited beads and charms design. Although they are good enough to make pretty bag charms and bracelets, we hope for more variety when choosing the character charms when customising them.

Now we have array of different sizes, shapes, colors and design for our beads collection. Even the character charms, we have more than just rainbows and macaroon. We can say that the collection is so huge that Matilda can sometimes forget she has that range of charms to add - on.

We continue to source from our suppliers for pretty and sweet charms to fit into our My Little Pony story charms. Always in a lookout for them. So don't forget to follow us on our Instagram or "Like" our Facebook Page to keep yourself posted with our latest range of Pony, Charms and beads design.

XOXO
Love,
Vanilla Dreams Team


Friday 1 April 2016

Our 1st BLOG

Our Creations

Our very first blog and the very first post of the new blog. If you were to ask me why after so long then we started off our blog, to be honest, we will have no idea how to reply you.

By the way, it's Matilda here writing this blog. Pardon me if I will sometimes mention we , our and I don't see myself doing this on my own as I have my very own supportive group of family and friends. They are my inspiration and my love. 

I've been doing this creations for the past 6 months and everything has been so well.

Just a brief idea for our readers out there, we have been in this business since 7th August 2014. We started creating Rainbowlooms when it was really in trend back then before or the rubber allergies were in the news and we are too creating own squishy with sponges from Daiso, acrylic paint and Puffy paint (you may want to visit my personal Facebook profile to take a look at my rainbow loom and squishy photos. I even have youtube videos teaching how to make them. But those are just for fun back then)

After having fun with all these I thought, maybe I can try something little bit different by starting a online toy shop selling retail squishy (not squishy that is home-made). And from there we slowly venture into more toys like My Little Pony, Shopkins etc. And back then, we only sell toys and figurines.

Eventually, we were in love with My Little Pony and we make use of the 2inches My Little Pony figurines and started to design and create bag charms, keychains, bracelet, necklaces and hair ties. 

So now, since the collection is getting bigger. I thought it is time I can showcase the collection of OUR CREATIONS and hopefully in future to showcase more of our new creations coming up. Which I'm personally very excited about.

It's time for me to go create more now and I'm hopeful to update on this blog as much as I can to keep it interesting. Meanwhile, you may visit our website www.vanilla-dreams.com if you would like to purchase our creations, follow us on Instagram @vanilladreamssg, like our Facebook page.

Hope to hear from you soon!!

XOXO
Matilda
Vanilla Dreams